Monday, 31 August 2015

How to browse anonymously on Android phone

In this tutorial we will show you “How to browse anonymously on Android phone”.
Step 1: Download and install Orbot and Orweb from Google Play Store
Orbot: Proxy with Tor: http://bit.ly/1a15JMf
Orweb: Private Web Browser: http://bit.ly/1dUSn1e
Step 2: Turn on Orbot and click “Check browser”. Now you can surf on internet.
Step 3: Once you have finished using it Turn off Orbot to save your battery.
Note: Use it in a legal way.

How to access blocked websites? 6-Ways

access-blocked-websites
Short Bytes: Restrictions and bans over websites are always annoying, and governments are now censoring content more than ever. Check out the 6 easy ways to bypass the censorship to access blocked websites.
 Given the current stature of the constitutional “Rights” and “Freedoms” conferred upon the public in most of the democracies, censorship and bans on trivial matters often come as a surprise. And in the era of the Internet, harassing the general public is even easier. Be it the controversial net neutrality, or restriction to access to specific websites.
If you also feel stifled by the blocked websites then here are some ways to access blocked websites:

1. Become Anonymous: Use Proxy Websites

A proxy website becomes a moderator between the user and server site. The proxy website camouflages the blocked site from the ISPs and allows you to access blocked websites. To get a proxy website for any blocked site, just perform the Google search.
Eg: Facebook Proxy Server. In case, Facebook is blocked in your institution, or you can go to
http://www.spysurfing.com/
http://proxify.us/p/ and more…

2. Use VPN

VPN or Virtual Proxy Network allows you to connect your device to a secure connection to another network over the internet. VPN enables you to access blocked websites from your home network and puts your IP address in a land far away. You can also download the apps or open the sites blocked in your country.
Check out our How To set-up VPN on Android devices without the need of any software

3. Use IP Rather Than URL

The blocked website sometimes are stored as a list of URLs and using IP of the website might work in few of the cases. To get the IP address for any website, you do a ping domain.com command in Command Prompt.
Using IP is a simple way to access blocked websites in your region. However, if the website had hidden its IP too, then it won’t open with this method.

4. Change Network Proxy In Browsers

Your college or institute might be having more than one proxy for its network. So, it happens that some websites are restricted on one proxy, but accessible in another. So, you can give a try to proxy surfing to access blocked websites in your college.
Change the advanced settings of your Firefox browser and select the Manual Proxy. Put the bypass proxy under HTTP proxy.

5. Use Google Translate

Institutes or even countries sometimes don’t ban Google Translate. So, you can bypass the restriction by converting the blocked website into some other language that you may know. Try Google Translate and see for yourself. It is yet another simple way to access blocked websites.

6. Bypass via Extensions

If the websites that are blocked by your institute or office are dynamic in nature such as Facebook or YouTube, then should give a try to these extensions. Hola and ProxMate are some extensions that you can use to access blocked websites.
These are some of the most effective and easy to use methods to circumvent the censorship that has been put on your favorite websites. Let us know which one do you prefer to access blocked websites in your region.

How To Set-up VPN on Android Devices (No Software Needed)

setup-vpn
Public Wi-Fi networks seem really convenient don’t they! Whether you are at McDonald’s (or just any other food joint offering an open Wi-Fi network for that sake), roaming around your college campus, just one tap of a button on your smartphone and voila the power of an internet connection rests in your hands.

With hackers and in fact sometimes our own governments lurking around, looking for just one opportunity to steal your data, you might want to give serious reconsideration before connecting. Somehow the idea of my bank credentials and personal information resting in someone else’s hands doesn’t seem to be very enthralling to me.
So how to overcome this problem? Simple just configure a Virtual Private Network (VPN).
A VPN would allow you to connect your device up to a secure connection to another network over the internet. In fact you can use it to access your home/company network while you are away, download apps which are not available in your country or simply keep your browsing and data secure over the public network.
So here is how to go about setting a VPN on your Android device:
Step 1. Go to Menu > Settings
Settings-VPNOnAndroid
Step 2. Now Click on More
More-VPNOnAndroid
Step 3. Now click on VPN and a screen like this one would open up:
VPN-VPNOnAndroid
Step 4. Now tap on the ‘+’ button at the right corner of the screen:
VPN2-VPNOnAndorid
Step 5. Here enter a Name for the VPN connection, select the type of VPN server you are connecting to and enter the VPN server’s address and then click save.
VPN3-VPNOnAndroid
Step 6. Now just tap on the created VPN to connect. You will be prompted to enter a username and password. After entering which you can connect to the VPN.
VPN4-VPNOnAndroid
Once you are connected you will see a Key Icon / “VPN activated” notification in the notification drawer. In case you want to disconnect, simply tap on the notification and tap Disconnect.
Bonus Tip: In case you want to ensure that your data is always sent over a VPN, for instance while using a public Wi-Fi network all you need to do is this:
Connect to a VPN, save your account information and then click on the three dots icon at the corner of the screen. After that click on the ‘Always-On VPN’ icon to access this feature.
AlwaysOnVPN-VPNOnAndroid
Note: I would advise readers to change their Screen Lock over from ‘Slide’ to ‘Pin’ or ‘Password’ otherwise they might get this error:
Problem1-VPNOnAndroid
Also, sometimes you might be prompted with this:
Problem2-VPNOnAndroid
Be careful because randomly entering passwords may cause your credential storage to be erased.
Problem3-VPNOnAndroid
Now there is absolutely no need to freak out. Here is where our first tip would come in handy, just simply change your PIN and the question will go away as the credentials would have been forced to be updated.

How To Take Backup Of Your Facebook Profile

You might wonder how to download your photos, videos and messages from Facebook, but you don’t need to. Facebook has introduced a feature where you can take a backup of your account with just one click.

How To Take Backup Of Your Facebook Profile

Step 1: Go to “Settings” option
Step 2: One “General Account Settings” tab, at the bottom you can see “Download a copy of your Facebook data.”
Step 3: Click “Download a copy of your Facebook data” and then press “Start My Activity”. Enter your password. Facebook will send you a mail to your account on“Download Request”.
Step 4: Wait for a few minutes, and check your mail. Facebook would have sent you another mail saying “Your download is ready”.
Step 5: Now you can go to your Facebook account and download your backup by clicking the button “Download Archive” in General settings tab.
Note: Wait for few minutes so that Facebook will backup your profile.

How to Use Pen Drive As RAM

Use-Pendrive-as-Ram
Nowadays, many programs take lots of memory during operation, which is a nightmare for low RAM systems. So to avoid this make your pen drive/USB of large size as RAM, which will allow your system to handle more operations and tasks. To know how to do this, follow the steps below.

Method 1 of 2: Using a USB Pen Drive as RAM in Windows XP

670px-Use-Pen-Drive-As-RAM-Step-1-Version-2
Step 1 Delete all the stuff on your pen drive.
  • Insert it and let the PC read it (minimum 2 GB).
670px-Use-Pen-Drive-As-RAM-Step-2-Version-2
Step 2 Right click on My Computer.
  • Click on Properties from context menu.
670px-Use-Pen-Drive-As-RAM-Step-3-Version-2
Step 3 Click on the Advanced tab.
670px-Use-Pen-Drive-As-RAM-Step-4-Version-2
 Step 4 Click on Settings under Performance.
670px-Use-Pen-Drive-As-RAM-Step-5-Version-2
Step 5 Click on the Advanced tab.
 670px-Use-Pen-Drive-As-RAM-Step-6-Version-2
Step 6 Click on the Change button under Virtual memory.
670px-Use-Pen-Drive-As-RAM-Step-7-Version-2
Step 7 Select your USB drive.
670px-Use-Pen-Drive-As-RAM-Step-8-Version-2
Step 8 Click on custom size radio button and give the values as follows;
  • Initial Size:1020
  • Maximum size:1020
  • The size depends upon your free memory capacity of your pen drive. So you can change this limit according to your pen drive size.
670px-Use-Pen-Drive-As-RAM-Step-9-Version-2
Step 9 Click the Set button, then click on OK.
670px-Use-Pen-Drive-As-RAM-Step-10-Version-2
Step 10 Restart the computer with pen drive inserted.
  • The speed of your computer will be increased.

Method 2 of 2: Using a USB Pen Drive as RAM in Windows Vista and Windows 7 and 8

670px-Use-Pen-Drive-As-RAM-Step-11
Step 1 Insert your pen drive and format it.
670px-Use-Pen-Drive-As-RAM-Step-12
Step 2 Right click on your pen drive and click on “Properties”.
670px-Use-Pen-Drive-As-RAM-Step-13
Step 3 Click on ‘Ready boost’ tab and then on ‘Use this device’.
670px-Use-Pen-Drive-As-RAM-Step-14
Step 4 Choose maximum space to reserve system speed
670px-Use-Pen-Drive-As-RAM-Step-15
Step 5 Click on OK and Apply.
 670px-Use-Pen-Drive-As-RAM-Step-16
Tips
  • You must be logged in as Administrator to do this task.
  • If you are using Windows 7, start by doing steps 1 and 2, but then a different window will pop up. Click “Advanced system settings” on the sidebar and continue the steps.
Warnings
  • It may significantly shorten the life of the USB. Normal flash drives have limited numbers of writes. For normal usage, it takes a long time for the writes to run out. However, if used as RAM where millions of transfers are done every minute, the life of the drive may be significantly shortened.
  • Do not remove the USB. It’ll crash your system. However, simply plugging the USB back in and rebooting will fix the crash.

Find Out If Any One Opens Your Computer Without Your Permission

How to Know Who Logged into your computer and when?
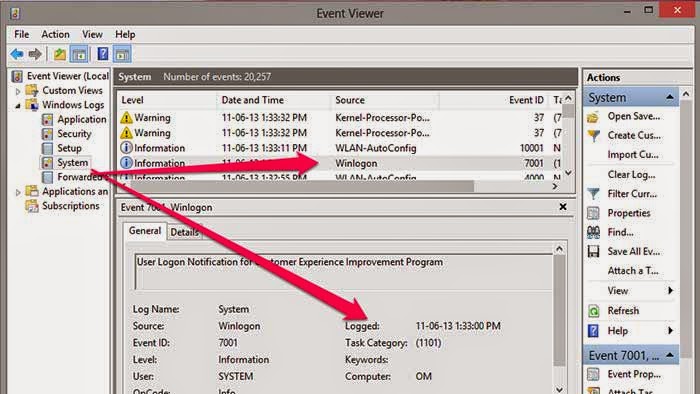
windows-login-event
In Windows, there is one in-built too will records all events in your computer called “Event Viewer”. This application records all your computer activities from login to log off etc.
The Event Viewer can be accessed in all Windows Operating system including Windows XP, Vista, Windows 7 and Windows 8.
Here, I”ll show you how to find the login events in Windows 8. To open the Event Viewer, type the eventvwr.msc in Run Command (Open run command Press Win + R Keys ) and press enter.
Now the Event Viewer utility will open, and many logs will be shown to you. To get login events of you computer click Windows logs -> System in the left panel.
The System log will show all the logs from kernel, Wireless network service start. There you can also find out the login event “Winlogon”. Just click the login event to display the properties of that event in the panel below.
In the properties, you can get the much needed information such as Login time, user account, event ID.
Note : If you have found that someone has accessed your computer, change your user password immediately with complex one and scan your computer with Best Antivirus applications and Anti-malware security applications, remove threats if you found.

AZ Screen Recorder – No Root


AZ Screen Recorder – No Root
Featured on Google Play Home Page, Android Police, Yahoo News, CNET, Android Central, Droid-Life and more.
AZ Screen Recorder is the best app to record the screen of your Lollipop. It does NOT require root access, no time limit, no watermark, ad free and very easy to use with one action to start and stop recording.
This screen recording app will let you make beautiful screencast videos by providing every feature that you need in a simple and elegant user experience design.
AZ screen recorder lets you record your screen to HD and FullHD videos and it is the only screencast app in the Android market that can be paused and resumed while recording.
You can also record audio from the mic and it is automatically muxed into the screencast videos. That makes it very convenient to create tutorial, promotional video, comment about your game and gameplay or record video chat.
The floating window always staying on top will let you snap at the exact moment on any screen.
In the settings, you can enable screen touches so the people who are watching your videos will know exactly what you are doing.
Additionally, there are many other features in this free screen recorder such as setting video resolution, bit-rate, screen orientation, customized timer to stop, saving directory selection, view/share or delete your recorded videos… All of them are free for you!
How to install?
  1. Save the downloaded .apk on your android phone’s SD card
  2. Run and install it
  3. That’s it,Enjoy! :)